USB Network Native Driver for ESXi 8.0U1 (v1.12) and 8.0U2 (v1.13)

 因为 VMware 在被 Broadcom 收购后关闭了 Flings 网站,此社区版驱动文档迁移到了 USB Network Native Driver for ESXi Documentation – VMware Technology Network VMTN

之前发布的8.0U1 和 8.0U2 的下载链接暂时无法从 VMware 官网获得,不过有网友事先通过 archive.org留存了备份,如下https://archive.org/download/flings.vmware.com/Flings/USB%20Network%20Native%20Driver%20for%20ESXi/

请注意以下更新提示

Changelog

Sep 21, 2023 – v1.13

  • Added support for ESXi 8.0 Update 2
  • ESXi80U2-VMKUSB-NIC-FLING-67561870-component-22416446.zip (md5: bf62144b4e695c3d00cb614a4ecfb2c3)

Note:

This is ONLY for ESXi 8.0 Update 2, for other ESXi versions (including update releases), please ensure you are using the correct version of driver.


Apr 26, 2023 – v1.12

  • Added support for ESXi 8.0 Update 1
  • Added support for new DLINK RTL8156 device (0x2001:0xb301)
  • Fixed 2.5GbE link speed issue for RTL8156 adapter
  • Updated maximum supported USB Network devices to 12 and persists setting over module parameters
  • ESXi800-VMKUSB-NIC-FLING-64098182-component-21668107.zip (md5: 4a35899f77ce4635d0cfa76a7975504d)
  • ESXi80U1-VMKUSB-NIC-FLING-64098092-component-21669994.zip (md5: 9c41b5f488ec5cee325207e16b047c10)

Note 1:

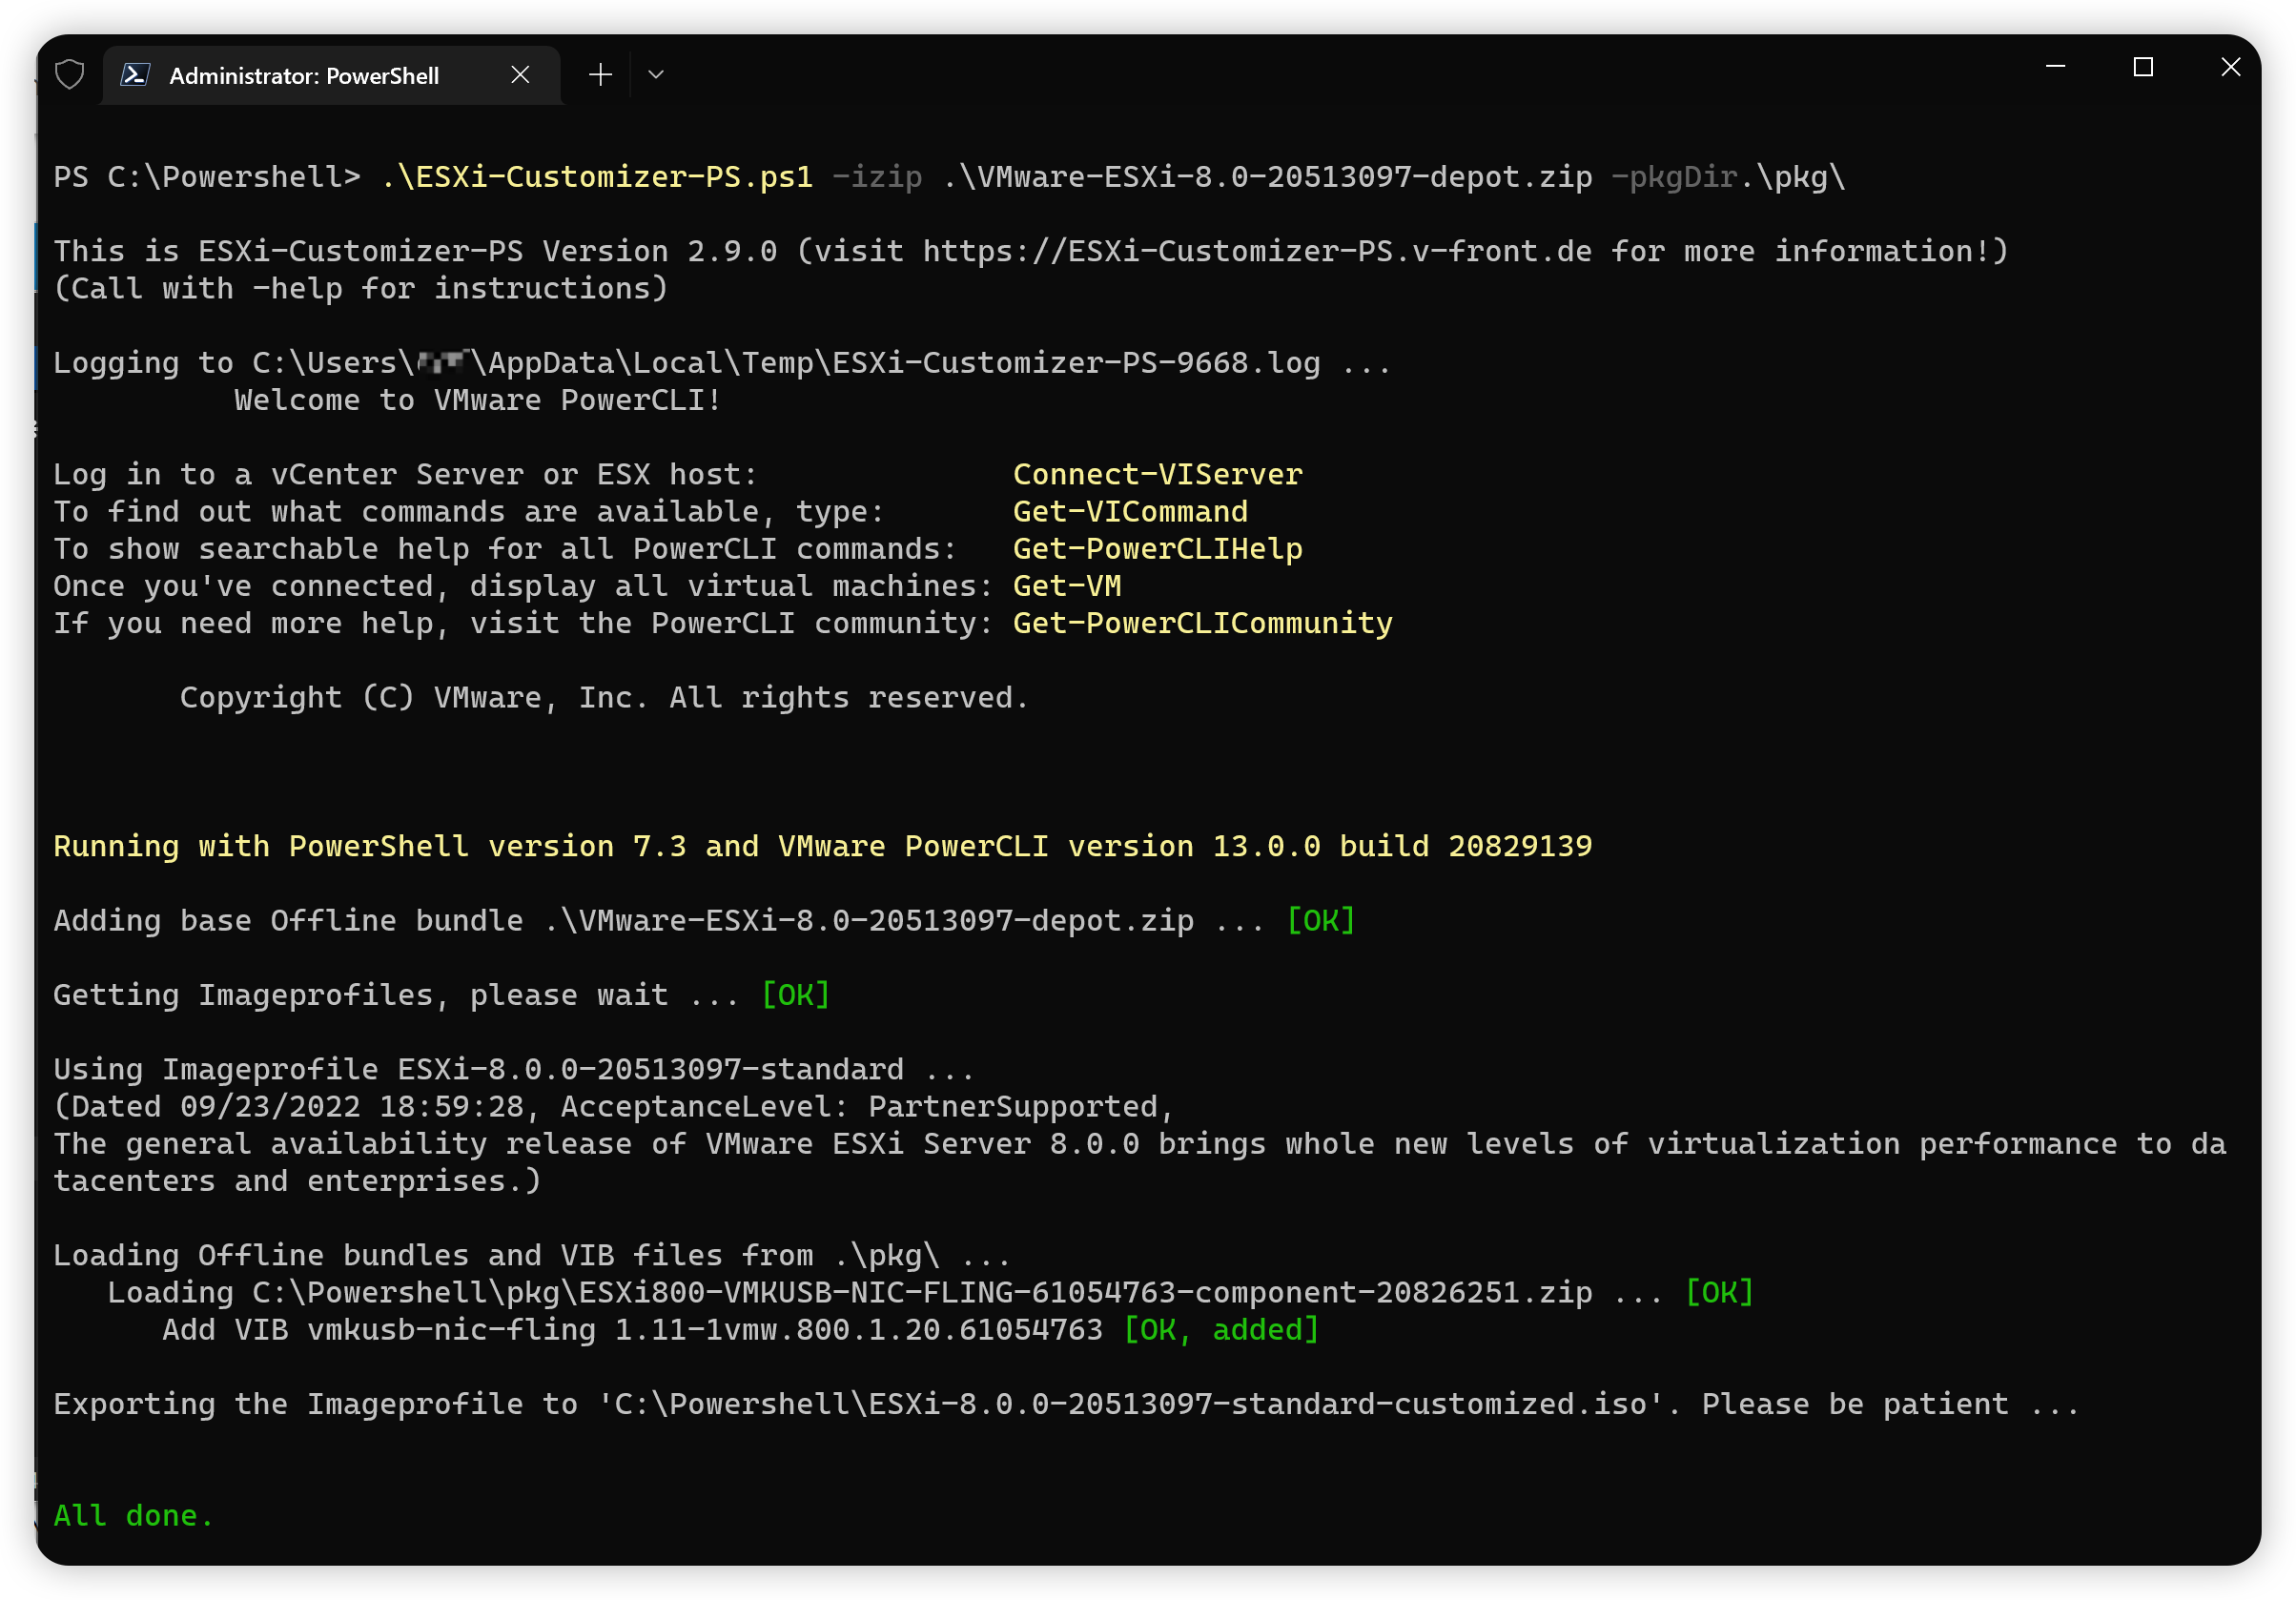
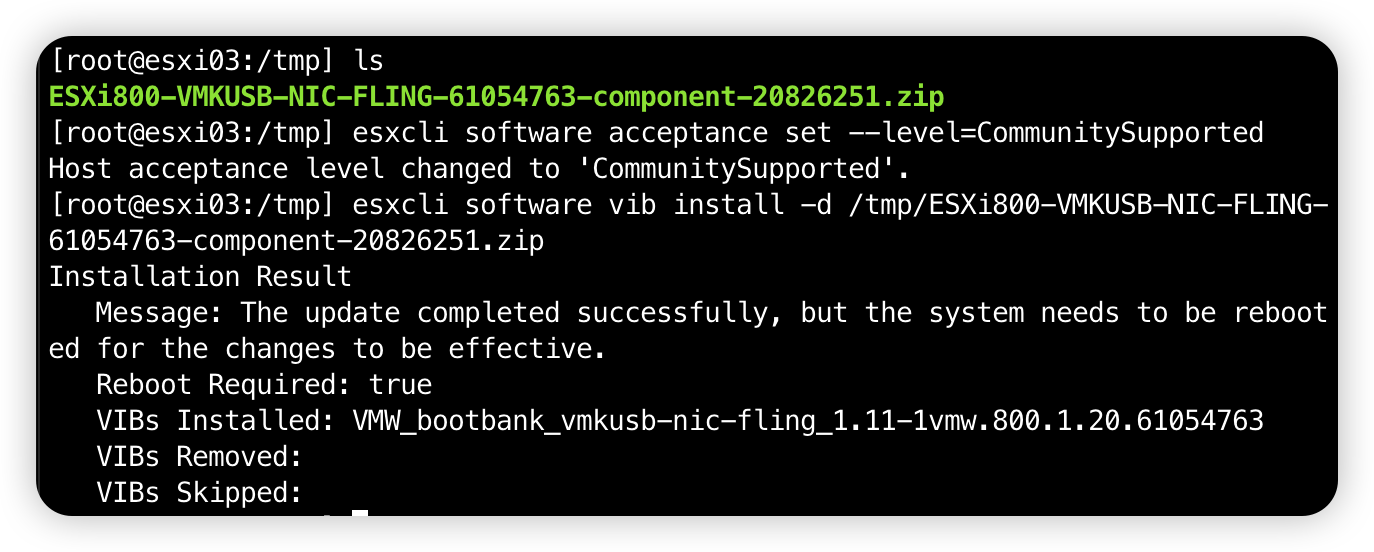
This is ONLY for ESXi 8.0 & 8.0 Update 1, for other ESXi versions (including update releases), please ensure you are using the correct version of driver.

Note 2:

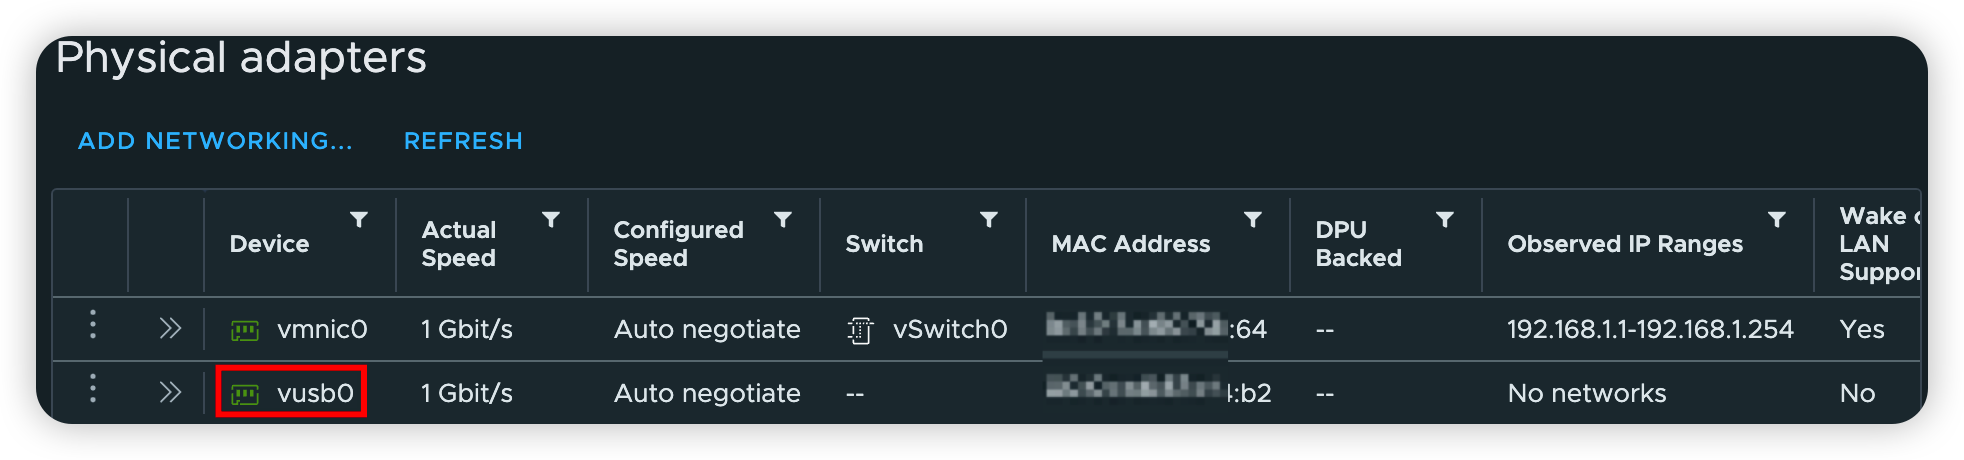
Known performance issue with RTL8156, TX up to 2.35Gbps while RX up to 2.15Gbps ​

ESXi for ARM 1.15

官方文档页面已从 Flings 迁移到 ESXi-Arm Fling 1.15 Refresh – VMware Technology Network VMTN

下载地址为 https://customerconnect.vmware.com/downloads/get-download?downloadGroup=ESXI-ARM

需要VMware Customer Connect 账号登录。

更新如下:

Changes in this release

  • Support Virtual CPU Performance Counters.
  • Fix Virtual UEFI for the Arm Architecture Compliance Suite.
  • Update EQOS driver:
    • Fix byte-swapped MAC address (important note below!)
    • Add IEEE 802.3x flow control support
  • Support for PCIe devices on Raspberry Pi Compute Module 4 (important note below!)
  • Report Arm DEN0028 defined SoC version and revision (as returned by the SMCCC_ARCH_SOC_ID SMC call) via telemetry.

其中有一点是对树莓派CM4的 PCIe 支持(只测试过 NVMe)。 ​

ESXi for ARM 最新下载地址

由于VMware决定关闭 flings.vmware.com 网站,内容被迁移到不同的地方,网站跳转到 https://developer.vmware.com/samples

ESXi for ARM的下载地址迁移到了 https://customerconnect.vmware.com/downloads/get-download?downloadGroup=ESXI-ARM,需要使用VMware Customer Connect账号登录。

相关文档迁移到了 https://communities.vmware.com/t5/ESXi-Arm-Fling-Documents/VMware-ESXi-Arm-Documentation/ta-p/2993062

目前最新版还是20230901的1.14版本。

USB Network Native Driver for ESXi更新支持ESXi8.0

 在ESXi8.0发布一个多月后,社区版的USB网卡驱动终于在flings上更新了,USB Network Native Driver for ESXi | VMware Flings

Nov 23, 2022 – v1.11
Added support for ESXi 8.0
      ESXi800-VMKUSB-NIC-FLING-61054763-component-20826251.zip
      md5: 55087041545d2500c1b22deb65107f22

Note: This is ONLY for ESXi 8.0, for other ESXi versions (including update releases), please ensure you are using the correct version of driver.

https://flings.vmware.com/usb-network-native-driver-for-esxi#changelog

来尝试下封装驱动,PowerCLI近期也更新到了13.0,https://www.powershellgallery.com/packages/VMware.PowerCLI/13.0.0.20829139

Install-Module -Name VMware.PowerCLI

接着验证下安装的版本

Get-Module -Name VMware.PowerCLI | Select-Object -Property Name,Version
验证安装的版本

需要注意的是,PowerCLI 13.0中的VMware.ImageBuilder 模块是依赖Python3.7的,参照https://developer.vmware.com/docs/15315/powercli-user-s-guide/GUID-9081EBAF-BF85-48B1-82A0-D1C49F3FF1E8.html

这里需要做几点:

  1. 下载 Python 3.7 https://www.python.org/downloads/release/python-370/.
  2. 安装Python 3.7.
  3. 保存 get-pip.py https://bootstrap.pypa.io/get-pip.py.
  4. 打开终端安装pip.<python3.7-directory>\python.exe <get-pip-directory>\get-pip.py
  5. 安装所需的Python模块.<python3.7-directory>\Scripts\pip3.7.exe install six psutil lxml pyopenssl
https://vdc-repo.vmware.com/vmwb-repository/dcr-public/9619cb6d-3975-4bff-aa1f-0e785283a1a9/4e10b776-59b2-42f9-af52-c8cca2b7ecbe/GUID-F98FF88D-D31F-48F0-8C3A-1C6492CD8AFB.html

在Powershell中配置Python3.7路径

  • 在Windows上 Set-PowerCLIConfiguration –PythonPath <python3.7-directory>\python.exe –Scope User

https://vdc-repo.vmware.com/vmwb-repository/dcr-public/9619cb6d-3975-4bff-aa1f-0e785283a1a9/4e10b776-59b2-42f9-af52-c8cca2b7ecbe/GUID-EB16871E-D52B-4B46-9675-241AD42C1BE6.html

https://github.com/VFrontDe-Org/ESXi-Customizer-PS 下载封装脚本,最新为2.9.0.

下载原版的ESXi 8.0离线包 VMware-ESXi-8.0-20513097-depot.zip

下载最新的 支持8.0的USB网卡驱动 ESXi800-VMKUSB-NIC-FLING-61054763-component-20826251.zip

以管理员权限运行Powershell

封装成功

由于我之前已经在机器上安装了原版ESXi 8.0,这里就不重新安装了。在现有ESXi上安装这个驱动再插上USB网卡试试。

成功安装驱动

安装后需要重启ESXi。

Web Console里有提示

我一般习惯把开机的VM Suspend,然后进入维护模式后重启ESXi。

重启开机就识别到了

VMware Fusion 13 正式版终于来了

千呼万唤,经历两年之久,VMware终于在Fusion 13正式版中支持了Apple Silicon 版Mac,此次发布的Fusion是Universal版本,也就是一个安装包同时适配Intel Mac及Apple Silicon (M1,M2)Mac。想起我两年前的

打脸时间:

对此,我谨慎做些猜测:

Fusion on Apple Silicon首先会以universal app形式支持Apple Silicon,并首先可以虚拟一些arm64的 Linux虚拟机和BigSur,正如现在ESXi on Arm所支持的。这个应该不会很久。问题也不大。

虚拟Windows on Arm也会类似PD一样,在微软提供类似授权和模拟运行x86 windows程序后去提供支持。而微软提供模拟运行x86 windows程序,更多的是为了带动它的合作伙伴(常见的PC厂商)去上Windows on Arm。所以如果微软不授权Apple Silicon上利用虚拟机运行Windows on Arm,也不是不可能哦。正如之前苹果不授权在非苹果设备上运行“黑苹果”或者虚拟macOS一样,没有授权,你只能去“黑”,去“解锁”。并非常规手段。

至于模拟x86 windows或者其他x86/AMD64系统,我觉得短期不可能实现,这个工作量不是一般的大。如果上面一条做的好话,模拟x86 windows这个意义也没那么重要了。

欢迎PD和Fusion来打脸。

关于Fusion on Apple Silicon的谨慎猜测 – Virtual Tips

第一点,我说会以Universal app形式支持Apple Silicon,这个没错,此次发布的Fusion 13.0就是Universal版本,当时我预测在Apple Silicon的macOS上可以虚拟arm64的Linux和macOS,没想到虚拟macOS的选项已经没了(打脸)。(在Intel的macOS上还可以虚拟macOS)。而且,竟然等了整整2年!(打脸)

第二点,继续打脸,在Apple Silicon上可以虚拟Windows 11 on Arm了!而且微软的模拟运行x86/x64 windows程序支持的也不错了,(毕竟两年过去了)。(具体的安装问题可以参考在ESXi on Arm上安装Windows 11 on Arm。ESXi Arm Edition version 1.11更新,及安装Win11 Arm版 – Virtual Tips

WinRAR X64版本正常使用
任务管理器里可以看到架构

另外,个人用户仍就可以使用免费的Player版本。

ESXi Arm Edition version 1.11更新,及安装Win11 Arm版

根据ESXi Arm Edition | VMware Flings,带来了一些bug fix,支持vTPM, virtual Secure Boot和加密虚拟机等,并且增加了Windows的VMware Tools。

Oct 26, 2022 – v1.11

Note: Upgrade is NOW supported from earlier ESXi-Arm 1.x Fling releases

  • Support CPU accelerated crypto (e.g. NEON, Armv8 Cryptographic Extensions) for built-in ESX services
  • Fixed ESXi xterm-256color terminfo. Terminal.app in macOS (or any modern terminal, on any OS) now properly renders esxtop
  • Updated the virtual UEFI ROM to match the version used by VMware Fusion for Apple silicon
  • Support for virtual HTTP boot
  • Support for virtual TPM, virtual Secure Boot, and encrypted VMs
  • Support for physical GICv4 systems
  • Added VMware Tools for Windows
  • Fixed issue with ixgben driver

Known Issues:

  • Ampere Altra-based systems may PSOD when AHCI disks are used
  • Ubuntu 22.04 LTS installer graphics do not work. Please use Ubuntu 22.10
  • Windows SVGA driver does not work and must not be installed (or use safe mode to uninstall the svga device)

Build 20693597
VMware-VMvisor-Installer-7.0.0-20693597.aarch64.iso

因为1.x版本之后可以更新,所以我就通过更新安装升级到了1.11。

Win11 Arm版ISO可以通过UUP dump这个网站去抓取。

对于安装Win11 Arm版 VM,有几个问题要解决:

  1. vTPM,这个需要使用vCenter中的Configure->Security->Key Providers 添加一个Standard Key Provider. 而这个Provider本身可以通过一些开源的KIMP项目实现。这里不详细说明,感兴趣的可以github里搜索些KIMP相关的repos。
  2. Windows 11安装过程中,可能会提示找不到网络而无法继续(这个在X64下也会遇到),这里需要Shift+F10进入命令行,使用OOBE\BYPASSNRO命令来增加无网络安装。
  3. Windows 11 Arm版没有内置VMXNET3驱动,ESXi Arm Edition里所谓的Windows版VMware Tools,再mount到VM后,里面就内置了一个VMXNet3驱动。
  4. ESXi Arm Edition上面更新日志里提到了SVGA driver不支持,奇怪的是上面提到的VMware Tools里就有SVGA driver,我就没有安装。

最终,Windows 11 Arm版就在ESXi Arm Edition上安装成功了。(由于我的ESXi Arm Edition是装在树莓派4上的,所以性能还是有些吃紧的。)

vSphere 8 (ESXi 8.0.0)

VMware 最新发布了vSphere 8 VMware vSphere 8.0 Release Notes

Notes: 请注意Release Notes中提到的被抛弃支持的硬件。

另外,ESXi 引导的最低内存要求已从 4 GB 增加到 8 GB。运行虚拟机所需的最小内存量仍为 8 GB。

如果只是旧的CPU不被支持了,可以在安装ESXi启动时Shift+O 后面加上空格allowLegacyCPU=true

第一时间在我的SuperMicro E302-9D上安装了vSphere 8 (ESXi 8.0.0)。

安装界面区别不大

我是用的IPMI远程安装 安装完成

ESXi Host Client登录 界面颜色怪怪的

可直通的硬件能看到的温度传感器 

如果跟我一样不喜欢这个界面,那么可以找到右上角帮助菜单里的关于。

这里可以切换Light(默认),Dark ,Classic(7.0),以及在三个主题下去Customize。

我更喜欢Dark这个主题。

另外vCenter Server也来到了8.0版本。(我也顺便一起切换了Dark主题) 


另外,虽然VMware宣称不官方支持ESXi8.0 on Apple Device,或者在vSphere 8上虚拟macOS。

但网友实测,原有的一些Intel CPU的Mac设备,还是能继续安装使用ESXi8.0的。

比如Intel Mac Mini 2018(8,1),默认安装会失败,需要在安装镜像的 EFI/boot/boot.cfg 中最后添加一行norts=1,这样安装能够正常完成。但是安装完成后不要直接重启,需要到 /bootbank分区更新boot.cfg, 方法是ALT+F1进入ESXi Shell,然后去编辑文件加入norts=1,保存后再重起就没问题了。

也有网友确认Intel Mac Pro 2019(7,1)也没有问题。

稍微老一点的Intel Mac Mini,就需要在安装启动时加入allowLegacyCPU=true了。比如2011(5,3), 2012(6,1, 6,2), 2014(7,1)。但是据说2011款内置的网卡不支持了,建议使用雷电2转以太网。

我自己还尝试了在Intel NUC 10上安装 ESXi8.0,没有遇到任何问题。 ​

ESXi Arm Edition version 1.10更新

2022.07.20,VMware Flings上,ESXi Arm Edition 又更新了,此次1.10版本有以下更新:

Note: Upgrade is NOW supported from earlier ESXi-Arm 1.x Fling releases

  • Upgrade from earlier ESXi-Arm 1.x Fling is now supported
  • Support for Arm DEN0115 (PCIe config space access via firmware interface, tested with Raspberry Pi)
  • Report L3 cache info for Ampere eMAG
  • Minor improvements to non-cache coherent DMA support
  • Raspberry Pi NIC (genet) statistics
  • GOS: use VNXNET3 and PVSCSI as default for freebsd12
  • Support for RK3566 SBCs (e.g. Quartz64)
    • PCIe support (NVMe not supported at this time)
    • EQOS (onboard) NIC support
  • Fix missing barriers for Intel igbn NIC driver, improving stability
  • Return zero for unknown sys_reg(3, 0, 0, x, y) accesses from VMs
  • Telemetry reporting – Collect statistics on what kind of systems the Fling is being run on, to best gauge interest
    • No PII is collected. Here are items collected:
      • CPU info: core count, NUMA, manufacturer, etc.
      • Firmware info: vendor, version
      • Platform info: vendor, product, UUID, PCI device list
      • ESXi-Arm info: version, patch level, product build
      • The /bin/telemetry script runs on every boot and at 00:00 every Saturday


      Build 20133114
      VMware-VMvisor-Installer-7.0.0-20133114.aarch64.iso 

其中最重要的就是,从这个版本开始,支持从旧版本更新安装了。(此前只能全新安装新版本。)本人把两个树莓派从旧版本直接更新安装到1.10. 

另外changelog 中提到了此版本会对系统的统计数据进行收集

  • Telemetry reporting – Collect statistics on what kind of systems the Fling is being run on, to best gauge interest
    • No PII is collected. Here are items collected:
      • CPU info: core count, NUMA, manufacturer, etc.
      • Firmware info: vendor, version
      • Platform info: vendor, product, UUID, PCI device list
      • ESXi-Arm info: version, patch level, product build
      • The /bin/telemetry script runs on every boot and at 00:00 every Saturday

虽然提到了 No PII (Personal Identifiable Information) is collected. 但如果对此数据收集有担心的话,可以去crontabs里禁用此计划任务。

也可以去/bin/telemetry.py 进行修改,或者把发送数据的方法调用注释掉,不被main执行就可以了。查看此python脚本我们也间接的学会了一些系统统计数据的查看办法。

从macOS Launchpad中删除重复的图标

罗技对原有的Logi Options进行了重新设计和改进,出了一个Beta版的Logi Options+的应用程序,用来管理一些比较新的鼠标键盘。

使用上体验还可以,但是更新几次以后,发现该Beta的更新程序可能有些bug,/Applications文件夹下的logioptionsplus.app文件是得到了覆盖更新,但是原有的Launchpad下的图标,会同时存在多份。

如图

​​

删除的方法:

打开Finder, 选择Go To -> Go To Folder (Command+Shift+G), 进入 /private/var/folders。

搜索 com.apple.dock.launchpad, 搜索范围 “folders”。

在搜索结果中,进入com.apple.dock.launchpad文件夹。里面有个db文件夹。

打开macOS的终端,cd进入上述的db文件夹。

在终端中执行下列命令:

sqlite3 db "delete from apps where title='Logi Options+';"&&killall Dock

再打开Launchpad,发现该App的所有图标都没了。

接下来去/Applications中启动logioptionsplus.app,发现Launchpad中的图标被创建了,只有一个。问题解决。 ​

使用PowerCli来创建自定义ESXi ISO镜像

之前我们封装ESXi ISO镜像大多使用的是GitHub – VFrontDe/ESXi-Customizer-PS: PowerCLI script that greatly simplifies and automates the process of creating fully patched and customized VMware ESXi installation images 这个项目的powershell脚本,把一些社区版驱动(比如网卡驱动,USB网卡驱动等)封装进ESXi ISO,这样安装时就可以直接识别相应的硬件了。

实际上上述脚本就是基于VMware.PowerCLI 来实现的。PowerCLI是VMware的一个非常强大的Powershell命令库,有近700 cmdlets 可以用来管理和自动化VMware很多产品(比如vSphere, vCloud Director, vRealize Operations Manager, vSAN, NSX-T, VMware Cloud Services, VMware Cloud on AWS, VMware HCX, VMware Site Recovery Manager, and VMware Horizon environments)。而PowerCLI 12.0.0版本更新中,关于ISO镜像,有如下描述:

New cmdlets for managing auto-bootstrapping and new-style depots in vSphere 7.0 have been added to the VMware.DeployAutomation and VMware.ImageBuilder module:

New/Set/Reset-LCMClusterRuleWithTransform
Get-DepotAddons
Get-DepotBaseImages
Get-DepotComponents
Get-DepotInfo
Get-DepotVibs
New-IsoImage
New-PxeImage

我们注意到它提到了加入了 New-IsoImage (通过VMware.ImageBuilder module)。

查询相关文档,New-IsoImage Command | VMware PowerCLI ReferenceCreate a Custom ESXi ISO Image with PowerCLI Cmdlets (vmware.com) 有很详细的使用方法。

接下来我们在Windows 11 (Windows 10同理)环境下配置下环境来学习下用法。

  1. “以管理员身份运行” Windows Powershell 或者Windows Terminal。
  2. Install-Module -Name VMware.PowerCLI 此过程中如果有提示是否安装NuGet以及是否要从”PSGallery”安装模块请选择“是”,“全是”。视网络情况,此安装过程可能需要几分钟。
  3. 设置Execution policy, Windows 默认不允许执行此类第三方脚本Set-ExecutionPolicy -ExecutionPolicy RemoteSigned -Scope LocalMachine 具体详细用法可以参照 Set-ExecutionPolicy (Microsoft.PowerShell.Security) – PowerShell | Microsoft Docs
  4. Import-Module VMware.ImageBuilder
  5. 我们先使用VMwre的官方online repo来查看有哪些Image profile Get-DepotBaseImages -Depot https://hostupdate.vmware.com/software/VUM/PRODUCTION/main/vmw-depot-index.xml 查询需要几十秒:

Version Vendor Release date
——- —— ————
7.0.0-1.25.16324942 VMware, Inc. 06/15/2020 23:00:00
7.0.0-1.20.16321839 VMware, Inc. 06/15/2020 23:00:00
7.0.0-1.0.15843807 VMware, Inc. 03/16/2020 08:40:41
7.0.1-0.35.19324898 VMware, Inc. 02/14/2022 23:00:00
7.0.1-0.15.17168206 VMware, Inc. 11/18/2020 23:00:00
7.0.1-0.10.17119627 VMware, Inc. 11/03/2020 23:00:00
7.0.1-0.25.17325551 VMware, Inc. 12/16/2020 23:00:00
7.0.1-0.20.17325020 VMware, Inc. 12/16/2020 23:00:00
7.0.1-0.30.17551050 VMware, Inc. 02/03/2021 23:00:00
7.0.1-0.0.16850804 VMware, Inc. 09/04/2020 16:33:22
7.0.2-0.0.17867351 VMware, Inc. 04/28/2021 23:00:00
7.0.2-0.15.18295176 VMware, Inc. 08/23/2021 23:00:00
7.0.2-0.20.18426014 VMware, Inc. 08/23/2021 23:00:00
7.0.2-0.25.18538813 VMware, Inc. 09/13/2021 23:00:00
7.0.2-0.30.19290878 VMware, Inc. 02/14/2022 23:00:00
7.0.3-0.20.19193900 VMware, Inc. 01/17/2022 23:00:00
7.0.3-0.30.19482531 VMware, Inc. 03/28/2022 23:00:00
7.0.3-0.35.19482537 VMware, Inc. 03/28/2022 23:00:00

其实-Depot这个参数也是可以指向一个本地的离线包(非ISO),比如:

Get-DepotBaseImages -Depot C:\CustomImage\VMware-ESXi-7.0U3c-19193900-depot.zip

Version Vendor Release date
——- —— ————
7.0.3-0.20.19193900 VMware, Inc. 01/17/2022 23:00:00

类似的还有Get-DepotAddons 和 Get-DepotComponents

比如可以查询社区版网卡驱动包:

Get-DepotComponents -Depot C:\CustomImage\Net-Community-Driver_1.2.7.0-1vmw.700.1.0.15843807_19480755.zip

  • 接下来创建一个自定义镜像的Spec (json格式):
{
    "base_image": {
        "version": "7.0.3-0.35.19482537"
    },
    "components": {
       "Net-Community-Driver": "1.2.7.0-1vmw.700.1.0.15843807"
   }
}
  • 利用前面查询到的离线包,驱动文件和spec文件来制作自定义镜像:
New-IsoImage -Depots "c:\CustomImage\VMware-ESXi-7.0U3c-19193900-depot.zip" , "c:\CustomImage\Net-Community-Driver_1.2.7.0-1vmw.700.1.0.15843807_19480755.zip" -SoftwareSpec "c:\CustomImage\spec.json" -Destination "c:\CustomImage\ESXi-70U3c-custom.iso"

此方法尝试封装USB NIC Flings时会报错,是该驱动的一个小bug,估计后续会修复。

New-IsoImage : Error retrieving file for VIB 'VMW_bootbank_vmkusb-nic-fling_1.8-3vmw.703.0.15.51233328':
("<zipfile.ZipExtFile name='vib20/vmkusb-nic-fling/VMW_bootbank_vmkusb-nic-fling_1.8-3vmw.703.0.15.51233328.vib'
mode='r' compress_type=deflate>", "Error opening file object for VIB
'VMW_bootbank_vmkusb-nic-fling_1.8-3vmw.703.0.15.51233328': Expected value '[]' for attribute 'swplatforms', but found
value '[<vmware.esximage.Vib.SoftwarePlatform object at 0x0000015A1ECEBB08>]'.").